

Connection to Voltage Supply
Connection to Voltage Supply
Section titled “Connection to Voltage Supply”***CAUTION:***Risk of electrical shock. Always de-energise circuits before starting any wiring and connections.
In this article the topic of voltage supply is covered, in the following sections:
- Voltage Supply - Top Of Device
- Powering The Device
- Wiring examples for SC-23
- Wiring examples for KR-63
- Recommended additional equipment
In the case that more information is required please refer to installation guide or get in touch with either the sales or operations team on 1300 651 137 to receive support from our Sydney based team.
Voltage Supply - Top Of Device
Section titled “Voltage Supply - Top Of Device”Note: The voltage supply connection area is the same for both the SC-23 and KR-63, however, the CT connection area is a different.
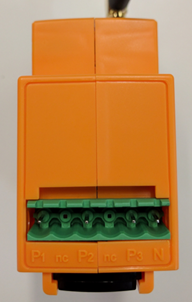
There are 3 positive connections labelled P1, P2 and P3 respectively and a neutral connection labelled N (as per figure below). These can be configured to monitor single, dual or three phase loads with the corresponding voltage phoenix plugs.
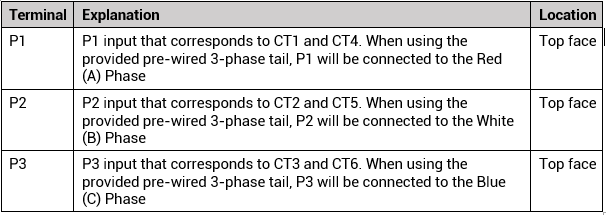
Please take note that CT connections need to correspond to the connections made in the voltage supply so that the current phase matches the phase of the voltage as per the following table:
Powering The Device
Section titled “Powering The Device”The Solar Analytics Smart Monitor needs to be supplied power by a voltage supply from the existing system, a circuit breaker needs to be used for this purpose:
- Ideally from an independent circuit breaker used specifically for the device
- The circuit breaker used needs to be rated at 16 A or lower
- The number of phases of the circuit breaker needs to match the number of phases of supply
P1 powers the device so it is important to ensure a stable power connection is being used to power P1.
Dangerous voltages are present at the connection point of the utility grid. Disconnect any connection points from all voltage sources and ensure the connection point is voltage-free.
- To monitor 1-phase systems, the supply to the SC-23 will need to be 1-phase. The pre-wired 1-phase tail provided should be used to connect the SC-23 to the voltage supply.
- For 3-phase installations using the SC-23, the 3-phase pre-wired tail can be purchased from Solar Analytics.
- Alternatively, you can easily re-wire the phoenix plug by removing the 2 loops (P1-P2 and P2-P3) and attaching a white and blue wire for the B and C phases respectively, or just one of the phases for a dual phase site.
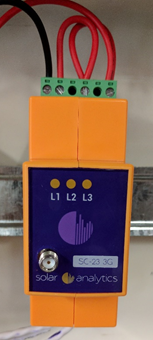
Dangerous voltages are present at the connection point of the utility grid. Disconnect any connection points from all voltage sources and ensure the connection point is voltage-free.
To monitor 3-phase systems, the supply to the KR-63 will need to be 3-phase. The pre-wired 3-phase tail provided should be used to connect the KR-63 to the voltage supply. (Shown below)
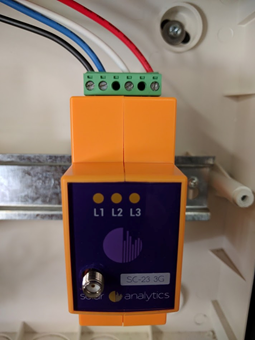
- To monitor 1-phase systems, the supply to the KR-63 will need to be 1-phase. The pre-wired 1-phase tail provided should be used to connect the KR-23 to the voltage supply.
- Alternatively, you can easily re-wire the phoenix plug by removing the necessary wires and bridging across the voltage references.
Recommended additional equipment
Section titled “Recommended additional equipment”- Up to 16A – 3-phase circuit breaker
If this is not possible, you should be able to use an existing 1-phase lighting circuit breaker in the distribution board. In most regular households, the lighting circuit breaker will be of adequate rating for this purpose. This lighting circuit can also be easily turned on/off easily without disrupting power supply to any major appliances in the house.
In the case of a 3 phase supply a 3 phase circuit breaker needs to be used. Likewise for a dual phase supply a circuit break of at least 2 phases needs to be used.
Please note that the information below refers to Solar Analytics branded smart monitoring devices. For more information on Wattwatchers branded smart monitoring devices, please check outWattwatchers with Solar Analytics.
Three to single phase power supply conversion
Section titled “Three to single phase power supply conversion”All Solar Analytics Hardware can be easily converted from 1 Phase to 2 Phase or 3 Phase and vice versa.
This short video shows how to convert the Solar Analytics wiring harness from 1 phase to 3 phase.
To convert 3 phase to 1 phase, we just need to reverse the above process. For 1-phase installations using the KR-63, the 1-phase pre-wired tail can be purchased from Solar Analytics. Alternatively, you can easily re-wire the phoenix plug by following the instructions below.
- Remove all the components from the packaging
- With a screwdriver, remove the white and blue wires from the phoenix plug
- Cut 2 x 5cm (approx.) of the red wire from the end of the tail to use as a loop
- From here, use the loops to loop P1 to P2 and P2 to P3.
- Once completed, the phoenix plug should look like this
Tug on the cable and loops to ensure a secure fit. You can now use this tail to power your KR-63 with a single-phase supply.